3D Print a Person From a Photo (2026 Guide + Free AI Tool)
3D print a person from a photo in 2026. Convert to STL/OBJ with AI, slice, and print a figurine. Full step-by-step guide with tool comparison.
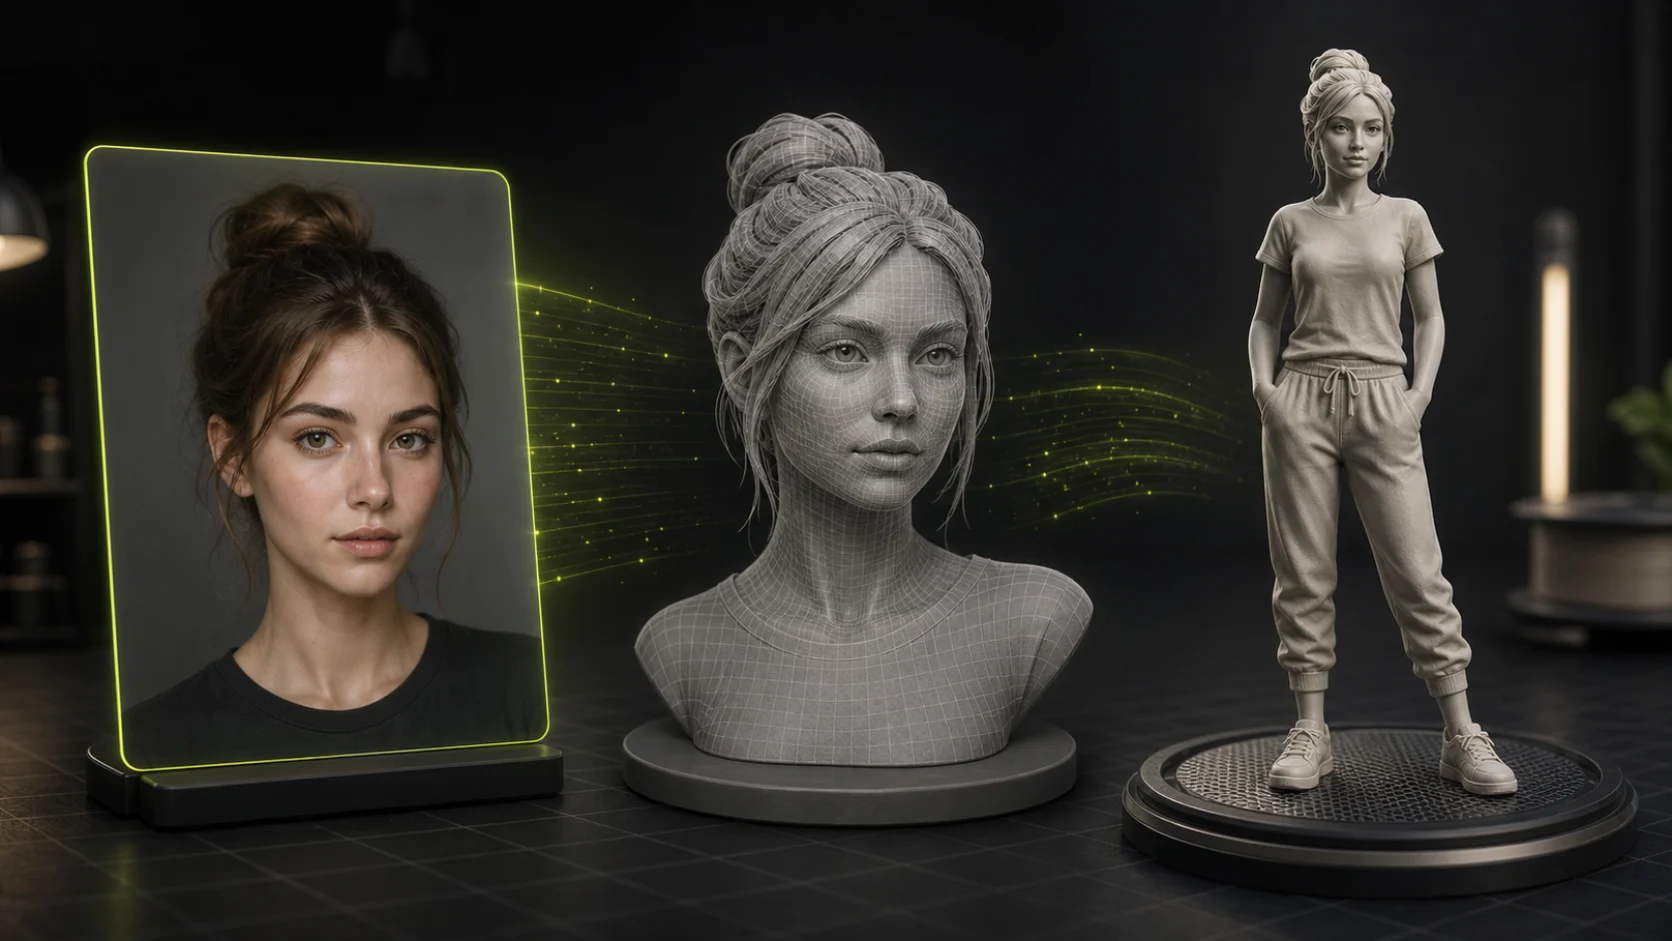
You can 3D print a person from a photo with a single front-facing portrait and a free AI tool — no 3D scanner, no manual modeling. The whole pipeline runs in minutes in 2026.
Search "3d print person from photo" and the answers split three ways. Some results sell you a figurine printing service. Some are forum threads asking if it is even possible. A few point at AI tools that promise a 3D mesh in a minute. The intent behind the search is just as mixed — some people want to buy a printed figure, some want to make one themselves, and some want a free tool to do it at home.
This guide is for the people who want to actually do it: take a photo, turn it into a real 3D mesh, and print a small statue or figurine on their own printer. It works with a single front-facing photo, costs nothing to try, and the whole pipeline runs in minutes in 2026.
Yes, it really works — and here is the full path, from camera to printed figure.
Can You Actually 3D Print a Person From a Photo?
Yes, and it is easier than most forum threads make it sound. The key is understanding what "from a photo" really means here.
A single 2D photo has no 3D data in it. To get a printable object you need a 3D mesh — a set of polygons that describes the surface of the person's head or body. In the past, the only ways to get that mesh were an expensive 3D scan or hours of manual 3D modeling. Neither is practical for most hobbyists.
That changed with AI image-to-3D models. A modern single-image-to-3D pipeline does four things under the hood:
- Depth estimation. A neural network predicts how far each pixel is from the camera, producing a depth map.
- Novel view synthesis. Because you only have one photo, the AI imagines the sides and back of the head or body using diffusion models.
- 3D reconstruction. The generated views are fused into a continuous surface.
- Mesh extraction. The surface is converted into a textured polygon mesh you can export as STL or OBJ — the exact formats a 3D printer or slicer reads.
The catch is honest: the front of the face is usually accurate, while the back is an inferred guess. For a figurine that faces the camera, that is perfectly fine. For a 360°-rotatable museum bust, expect to do some manual cleanup in Blender.
So the answer is yes — with one good photo and the right tool, you can go from image to printed person in an afternoon.
The 3-Step Process: Photo to Printed Person
The pipeline is the same no matter which tool you use. Three steps.
Step 1: Prepare Your Photo
The single biggest factor in how good your printed person looks is the input photo. Garbage in, garbage out — this step matters more than which printer you own.
The shot. Use a high-resolution photo (1080p or higher). The person should be front-facing, looking straight at the camera at eye level. Profile shots and extreme angles confuse the depth estimator and produce warped faces.
The lighting. Avoid harsh direct sunlight, which throws sharp shadows that the AI reads as facial features. Overcast outdoor light or soft indoor lighting gives the cleanest depth map. Even, flat light is the goal.
The background. Remove it. A busy background bleeds into the model and wastes geometry on things that are not the person. Use any background-removal tool (Canva, Photoshop, remove.bg, or even your phone's portrait cutout) to isolate the subject on a plain background before you generate the 3D mesh.
The framing. For a bust or head, fill the frame with the head and shoulders. For a full-body figurine, make sure the whole body is visible and not cropped at the edges. Cropped limbs print as flat cuts.
Step 2: Convert the Photo to a 3D Mesh
This is where AI does the heavy lifting. Upload the prepared photo to an image-to-3D tool and let it generate a mesh.
The fastest path is an AI image-to-3D generator like Trify3D. You upload the portrait, the model builds a textured 3D mesh in about a minute, and you can preview it, rotate it, and export it directly as STL or OBJ — the two formats a 3D printer slicer actually accepts. No manual modeling, no photogrammetry rig, no 50 photos from every angle.
One important detail: STL files carry geometry only (no color), while OBJ can carry color and texture. If your printer is single-color FDM, STL is enough. If you print full-color on a resin or color-capable machine, export OBJ to keep the textures.
Step 3: Slice and Print
Once you have the STL or OBJ file, the rest is standard 3D printing.
- Open the file in a slicer. Bambu Studio, PrusaSlicer, Cura, and OrcaSlicer all import STL and OBJ.
- Orient the model. Stand a bust upright; lay a full-body figurine on its back to minimize supports on the face.
- Add supports. Faces and chins almost always need supports. Use tree supports in PrusaSlicer or OrcaSlicer — they touch the model less and leave cleaner surfaces.
- Choose your layer height. For a face, 0.08–0.12 mm layer height preserves detail. For a larger figurine where strength matters more than detail, 0.16–0.20 mm is fine.
- Print. Slice to G-code and send it to the printer.
FDM vs resin for figurines. Resin (SLA / MSLA) prints people dramatically better than FDM — the detail on a face, hair, and eyes is in a different league. If your goal is a recognizable figurine and you have access to a resin printer, use it. FDM works for larger, less detailed figures and is far more forgiving and cheaper to run.
Best Tools to Turn a Photo Into a 3D Printable Person (2026)
There are a few real options, and they are not all the same. Here is how the main ones compare for the specific job of printing a person.
| Tool | What it does best | Export formats | Good for printing a person? |
|---|---|---|---|
| Trify3D | Single-photo to textured mesh, in-browser studio, direct STL/OBJ export | GLB, GLTF, OBJ, STL, FBX | Yes — exports print-ready STL/OBJ directly |
| Meshy AI | Image-to-3D with strong textures, popular for game assets | GLB, OBJ, STL, FBX, USDZ | Yes — solid general-purpose mesh |
| Bambu MakerWorld "Make My Statue" | Built for Bambu printers, auto-generates a bust from a portrait | STL (slicer-ready) | Yes — optimized for Bambu ecosystem |
| PrintPal Face to 3D Generator | Specialized for selfies → figurines, multiple styles | STL | Yes — purpose-built for figurines |
The practical pattern: generate the mesh with whichever tool fits your setup, then export STL or OBJ and slice it. If you want the shortest path — upload a photo and download a print-ready file without leaving the browser — Trify3D's image-to-3D tool exports STL and OBJ straight from the studio.
Tips for the Best Printed Person
These are the details that separate a recognizable figurine from a melted blob.
- Prioritize the face. The face is what makes a figurine look like the person. Crop tight, light soft, and print the face at the finest layer height your printer supports.
- Seal the back. Because the AI infers the back of the head, the back of a generated bust is often smooth or slightly off. Design your figurine so the back faces away — a bust on a stand only needs to look right from the front three-quarters.
- Scale before you slice. AI-generated meshes come in arbitrary units. Set the model to your real target size (e.g. 8 cm tall) in the slicer before adding supports.
- Use tree supports. For any organic shape — especially faces and hair — tree supports leave far less scarring than standard supports.
- Print a test small first. Before committing a 10-hour print, scale the model to 3 cm and print a quick draft. It catches orientation and support problems early.
- Resin for faces, FDM for bodies. Match the printer to the detail level you actually need.
What You Can Make: Three Common Projects
The same photo-to-3D-to-print pipeline produces a range of outputs.
1. A desk bust or head. The most popular project. A single front-facing portrait becomes a 6–10 cm head on a small base. Great for gifts, desk toys, and cake toppers.
2. A full-body figurine. Requires a full-body photo with the subject standing. Scales up to 10–16 cm. Expect more cleanup on the back and limbs.
3. A tabletop miniature. A stylized, lower-detail version scaled for board-game or D&D use. Best produced with a tool that offers a cartoon or tabletop style option so the model reads well at 28–32 mm scale.
Frequently Asked Questions
Can you 3D print a person from a single photo?
Yes. AI image-to-3D tools estimate depth from one photo, infer the unseen sides, and export a printable mesh. One good front-facing photo is enough for a bust or figurine; you do not need a 3D scan or dozens of photos.
What file format do I need to 3D print a person?
STL is the universal format for 3D printing and works in every slicer. OBJ adds color and texture. Export either from your image-to-3D tool — for example, Trify3D exports both STL and OBJ directly from the studio.
Is FDM or resin better for printing a person?
Resin (SLA) is dramatically better for faces, hair, and fine detail. FDM is cheaper, easier, and fine for larger or less detailed figurines. If realism on the face matters, use resin.
How much does it cost to 3D print a person from a photo?
Doing it yourself is essentially free beyond filament or resin and the AI tool's generation cost. A printed bust uses a few cents to a couple of dollars of material. Paid figurine printing services charge roughly $30–$100+ depending on size and color.
Do I need to remove the background from the photo first?
Yes. A clean, isolated subject on a plain background produces a far cleaner mesh. Busy backgrounds bleed into the model and waste geometry on the wrong things.
How accurate is the back of a 3D printed person from one photo?
The front is usually accurate. The back and sides are inferred by the AI and are a plausible guess, not a true reconstruction. Orient your print so the less-accurate back faces away from view.
Can I print this in color?
Only if your printer supports color (most resin and FDM printers are single-color). For color, export OBJ with textures. For single-color FDM, STL is enough and you can hand-paint the print afterward.
What size should I print a person figurine?
A desk bust is typically 6–10 cm tall. A full-body figurine scales to 10–16 cm. Tabletop miniatures use 28–32 mm scale. Set the target size in your slicer before adding supports.
How do I slice a 3D printed person for the best result?
Stand a bust upright and lay a full-body figurine on its back to keep supports off the face. Use tree supports in PrusaSlicer or OrcaSlicer, and print the face at 0.08–0.12 mm layer height.
Which AI tool is best for turning a photo into a 3D printable person?
Trify3D, Meshy AI, Bambu MakerWorld Make My Statue, and PrintPal Face to 3D all work. Pick by export format and ecosystem: Trify3D exports print-ready STL and OBJ straight from the browser; Bambu Make My Statue is optimized for Bambu printers.
Ready to Print a Person From Your Photo?
The whole pipeline comes down to: one good front-facing photo, an AI image-to-3D tool, and an STL or OBJ export your slicer can read.
The fastest way to start is Trify3D's image-to-3D tool — upload a portrait, preview the generated mesh, and export straight to STL or OBJ for printing. No scan rig, no manual modeling, no design skills required.
For the quick version with tool comparison and printer picks, see our photo to 3D printable statue hub.
Upload a photo and print your first figurine today.