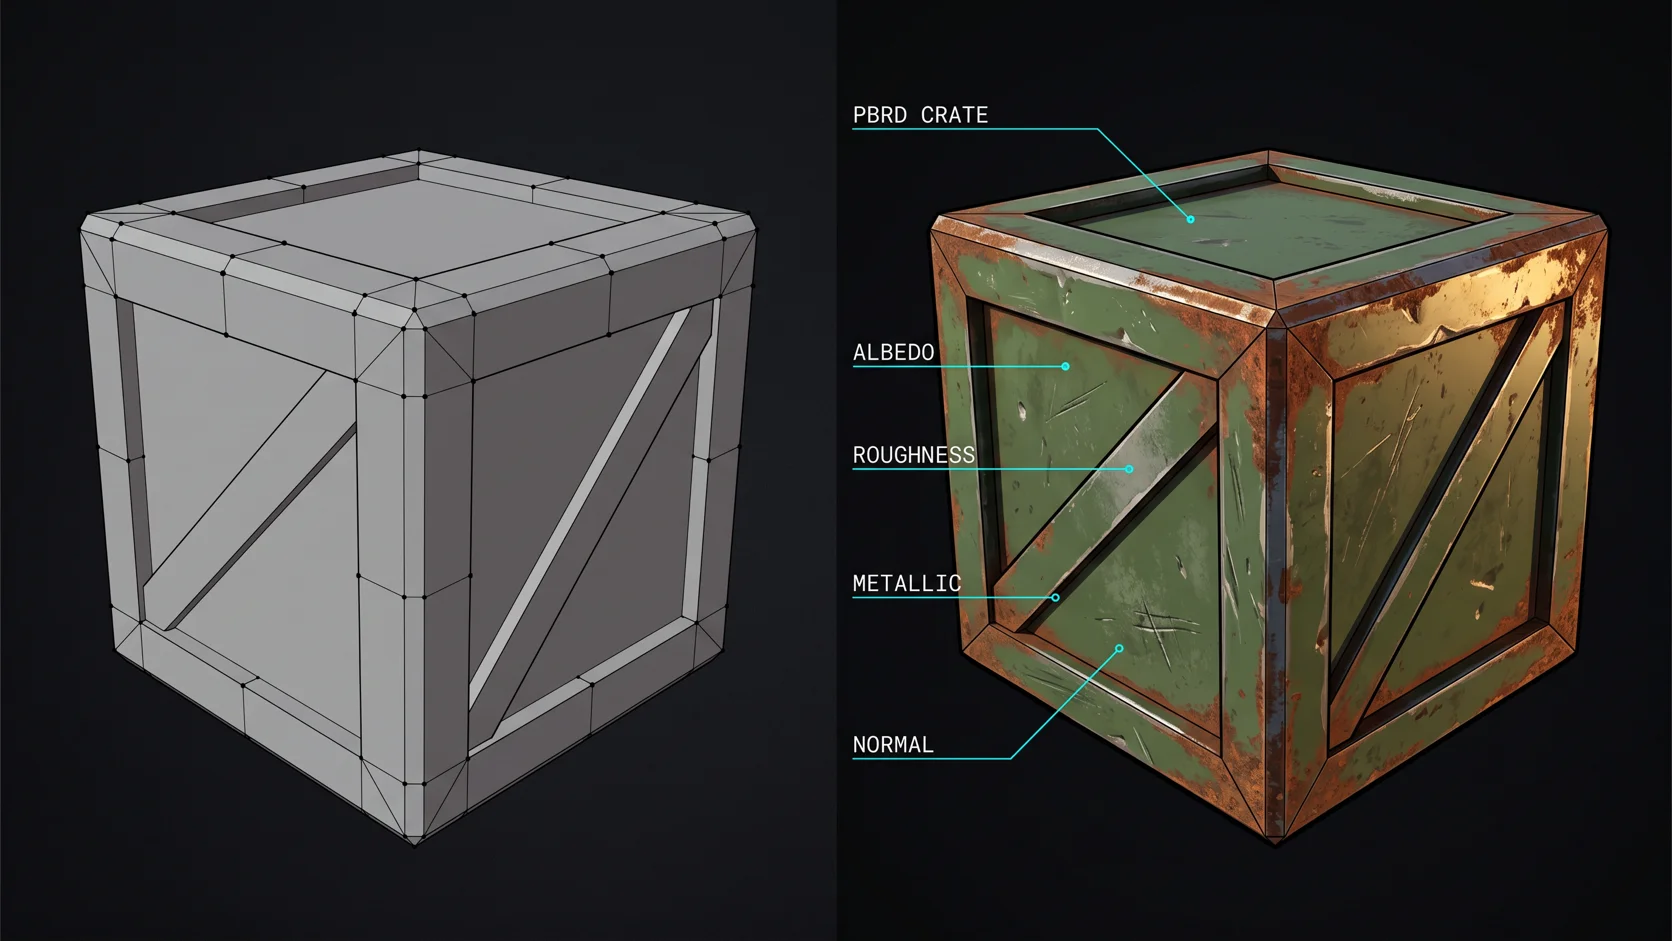
What Is PBR Texturing? The 2026 Plain-English Guide
What Is PBR Texturing?
TL;DR: PBR (physically based rendering) texturing is the convention of describing a material with a small set of measured maps — base color, surface detail, roughness, metalness — instead of baked lighting. The renderer does the lighting math at runtime, which means one texture set looks correct under noon sun, a torch in a dungeon, and a studio HDRI. If you have ever seen a game asset that instantly "reads" as rusted metal or wet stone in any scene, you were looking at a PBR material doing its job.
This guide covers what each map actually stores, the two workflow conventions you will run into, what changes in Unity and Unreal, and the mistakes that silently ruin PBR materials. If you want the practical counterpart — the full pipeline from UV unwrap to export — the guide on how to make textures for 3D models walks it step by step.
Why PBR became the standard
Before PBR, artists painted lighting into textures. A brick wall baked for outdoor daylight looked absurd indoors; studios maintained separate lighting variants of the same assets; and moving a light meant repainting. Every artist guessed at shading differently, so material consistency across a team was luck.
PBR inverted the responsibility. The texture stops describing "what this looks like in this scene" and starts describing "what this surface physically is." The renderer — Unity, Unreal, Blender Cycles, Three.js, whatever — owns the lighting. The payoff is concrete:
- One asset, any lighting. The same texture set works in a daylight scene, a night scene, and a product-reel studio setup without edits.
- Team consistency. Two artists following the same PBR convention produce materials that sit next to each other without one looking overexposed. Predictability is why every modern engine standardized on it in the mid-2010s.
- Cheap iteration. Changing the look means changing one grayscale value (roughness), not repainting a color texture.
The convention is documented by the Khronos Group for glTF and popularized for artists by Marmoset's PBR theory write-up and Adobe's Substance PBR guide. Those are the two references worth keeping open when a definition argument starts on your team.
The core maps, one at a time
A PBR material is a set of maps, each answering one physical question about the surface.
| Map | What it stores | Typical look |
|---|---|---|
| Albedo / Base Color | Diffuse reflectance — the surface's true color, no lighting | Flat color photo, shadows removed |
| Normal | Surface direction detail in tangent space | Purple-blue image |
| Roughness | Microsurface: matte vs glossy | Grayscale |
| Metallic | Is this metal or not | Near-binary grayscale |
| Ambient Occlusion (AO) | Pre-baked contact shadows in crevices | Grayscale, dark in gaps |
| Height | Actual displacement depth for parallax or tessellation | Grayscale, white = raised |
The two most confused pair — albedo and normal — get their own comparison in albedo vs normal map, including how to tell them apart at a glance.
Albedo (base color). The single most misunderstood map. It stores diffuse reflectance values — the color light bounces off the surface — with all lighting, shadow, and ambient occlusion information stripped out. Getting that stripped version from a photo is the whole discipline of photo-sourcing textures; an unedited photo is not an albedo, it is a lit rendering of one.
Normal. A trick to fake geometric detail without polygons. Each pixel stores a direction vector encoded as RGB (which is why normal maps look purple-blue). When light hits, the shader bends its lighting calculation to follow those stored directions, so a 500-triangle game prop can show screw heads, fabric weave, and panel gaps that would otherwise cost thousands of triangles.
Roughness. A grayscale map deciding how sharp or blurry reflections are: 0 (black) is a mirror, 1 (white) is pure chalk. In my experience this map does more perceptual work than beginners expect — I have watched a material go from "plastic toy" to "worn metal" on a roughness repaint alone, without touching albedo.
Metallic. Tells the shader whether to treat the surface as conductor or dielectric. It is near-binary in practice — 0 or 1 for most real materials, with in-between values only for dirty transition zones. Metals tint their reflections with albedo color; non-metals reflect white.
AO and Height are the optional two. AO adds contact darkening that real-time renderers otherwise miss; height enables parallax or displacement for close-up shots. Neither is required, and adding AO to the albedo by accident is a classic error (more below).
The two workflows: metallic/roughness vs specular/glossiness
You will meet both, and they describe the same physics differently.
Metallic/roughness (used by Unity, Unreal, glTF, Blender) splits materials by a metallic mask. Non-metal surfaces get their color from albedo and reflect white; metal surfaces tint reflections with the albedo. Roughness controls blur. This is the default everywhere now, and it is what GLB export carries.
Specular/glossiness (legacy, from the older Marmoset-documented generation of PBR) keeps albedo strictly diffuse and stores reflectance in a separate RGB specular map, with glossiness as the roughness analog. It was common in early PBR pipelines and survives in some legacy engines and older toolchains.
If you are starting fresh: use metallic/roughness. If you must convert, note the known trap — a fully black albedo with white specular is the degenerate case that breaks the conversion math. Toolchains that auto-convert will warn; hand-conversion has burned more than one studio.
PBR in game engines: what actually differs
The map set is portable; the settings are not. What changes per engine:
Unity. The Standard shader wants metallic/roughness (via a smoothness remap — Unity inverts roughness to smoothness, so a roughness map must be inverted on import or in the shader). Albedo goes in its own slot; normal, metallic, AO pack into dedicated channels. Watch the smoothness source dropdown — pointing it at the wrong channel is the most common Unity import mistake.
Unreal Engine. Unreal uses a specular scale (default 0.5) rather than a free specular map, and roughness plugs in directly. A missing roughness pin renders as fully glossy and confuses people who "did everything right" — connect it even for flat values.
Blender and Three.js. Both follow metallic/roughness cleanly. GLB import/export round-trips the four-map set with no conversion, which is why GLB is the interchange format this site recommends for anything carrying materials — see the export formats breakdown for the OBJ/STL caveats.
Common PBR mistakes (and the fixes)
- Lighting baked into albedo. In my experience it is the number-one error by a wide margin. Symptom: the material looks fine in one lighting setup and wrong everywhere else. Fix: re-derive albedo from the photo with shadow removal (or let a generation tool produce a clean albedo directly).
- AO painted into albedo instead of the AO slot. Symptom: crevices go pitch black and stay black under strong light. Fix: move the darkening to the AO map.
- Forgetting Unity's roughness inversion. Symptom: everything is glossy when it should be matte. Fix: invert roughness to smoothness on import.
- Grungy, mid-gray metallic maps. Symptom: surfaces read as strange half-conductors. Fix: push metallic toward 0 or 1 except at dirt transitions.
- Treating normal maps as color art. Symptom: someone "cleans up" a normal map in a photo editor and destroys the encoded vectors. Fix: never color-grade a normal map; regenerate it.
Do you have to make PBR maps by hand?
No — and this changed faster than most tutorials admit. Hand-authoring in Substance Painter is still the path for hero assets where every scratch is art-directed. But AI texture generation now produces the full four-map set from a text prompt, and on Trify3D's AI texturing flow the PBR maps generate together with the mesh itself, so a finished textured model comes out as one GLB. For background props, prototyping, and first drafts, the generated set is increasingly the starting point rather than the shortcut.
The honest tradeoff: generated textures give you physically plausible materials and save the UV-paint pass, but they will not match a hand-painted stylized art direction. Pick per asset, not per project.
Frequently Asked Questions
What does PBR stand for?
Physically based rendering. A shading convention where materials are described by measured surface properties and the renderer computes the lighting, so a material looks consistent under any light.
What maps do I need for a PBR material?
Four core maps: albedo, normal, roughness, metallic. AO and height are optional extras for contact shadows and parallax depth.
What is the difference between metallic/roughness and specular/glossiness workflows?
Two conventions for the same physics. Metallic/roughness is the modern default (Unity, Unreal, glTF); specular/glossiness is the legacy alternative. Starting fresh, use metallic/roughness.
Should lighting or shadows be painted into an albedo map?
No. Albedo is true color only — lighting baked in gets double-applied by the renderer and breaks under any light change.
Can I generate a full PBR texture set automatically?
Yes. AI texture generators produce all four maps from a prompt, and Trify3D generates them alongside the mesh in one pass.
Your Path From Here
- Solidify the concepts: read the albedo vs normal map comparison to kill the most common confusion.
- See the full pipeline: the texture creation guide covers UV unwrapping, baking, and Substance workflows.
- Skip the manual pass: try Trify3D's AI texturing to get a mesh with the PBR set already applied.
Last reviewed: October 2026. Engine defaults shift between versions — recheck your engine's material documentation when upgrading.
Run it yourself in Trify3D
Keep reading from this topic
Albedo vs Normal Map: What Each Stores, When You Need Which
Albedo vs normal map explained: what each map stores, why normal maps look purple, how they work together, and three checks to tell them apart.
TutorialsTrellis 2 Complete Guide: From Install to Production Workflow
The complete Trellis 2 guide for 2026: pick an install path (ComfyUI or no local GPU), run image-to-3D, text-to-3D, and multiview workflows, fix common errors, and compare Trellis 2 vs Hunyuan 3D.
TutorialsHow to Design 3D Print Models: 4 Paths & Rules
Learn how to design 3d print models with four paths, print-ready rules and a tolerance cheat sheet, then turn a photo into a printable model today.